Chapter 6: Controls
6.1. Control Panel (Operator Interface)
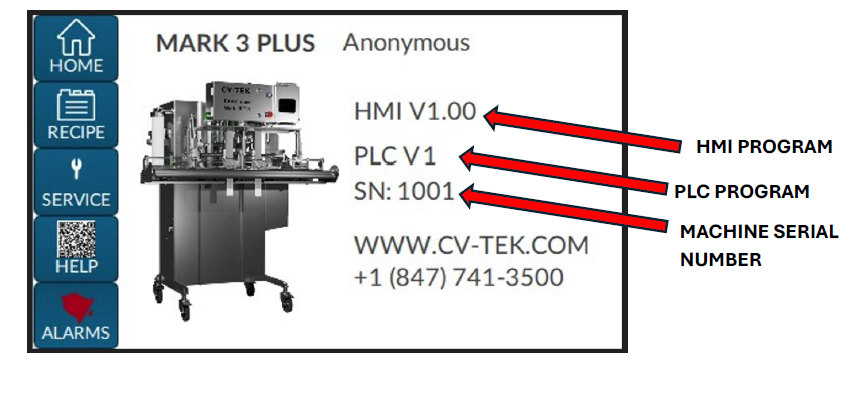
BOOT UP SCREEN
HOME SCREEN WILL DISPLAY MACHINE CURRENT STATUS
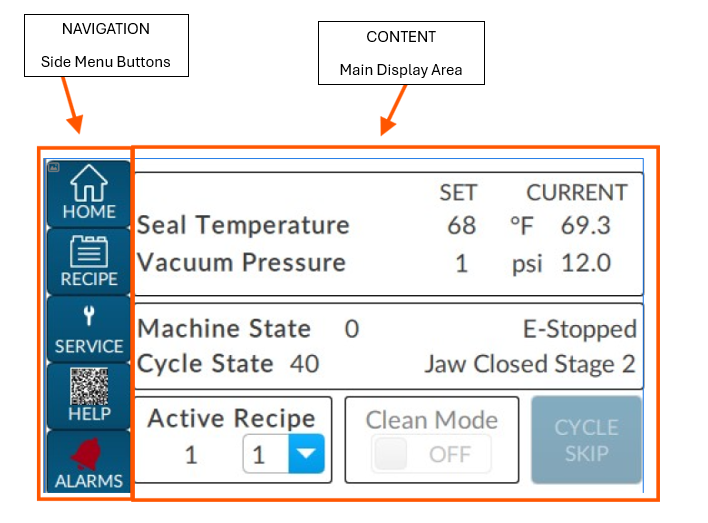
NAVIGATION: Side Menu Buttons will be present on all the screens.
- Home -machine status, settings, active recipe
- Recipe – see recipe values. Can be edited only by Maintenance users.
- Service – machine settings, IO Test, Panel Test, Maintenance, Info, Help
- Help – screen to help troubleshoot the machine
- Alarms- machine active and history alarms, including Help.
CONTENT: Main Display Area will be the place where the info will be presented.
HOME SCREEN
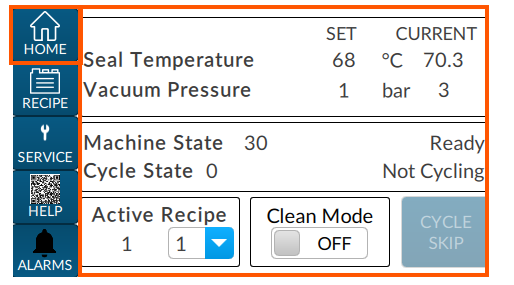
- Seal Temperature will display SET points and CURRENT value of seal bar temperature
- Vacuum Pressure will display the pressure in the vacuum circuit
- Machine State shows current state:
- E-Stopped
- Faulted
- Not Ready
- Ready
- Running
- Cycle State will display the cycles that the machine is following i.e.:
- Not in Auto
- Probes Down
- Jaw Close Stage 1
- Bag Stretchers Retract
- Bag Stretchers Up
- Jaw Close Stage 2
- Vacuum 1
- Soak 1
- Gas 1
- Pause 1
- …
- …
- ….
- Probes Up
- Preheat
- Seal Bar Close
- Seal Bar Open
- Jaw Open
- Bag Stretchers Down
- Complete
- Active Recipe displays the loaded recipe and can be changed out of 8 available
- Clean Mode and Cycle Skip options available if certain conditions are met.
RECIPE SCREEN
- Values can be edited by Maintenance logged in user ONLY!
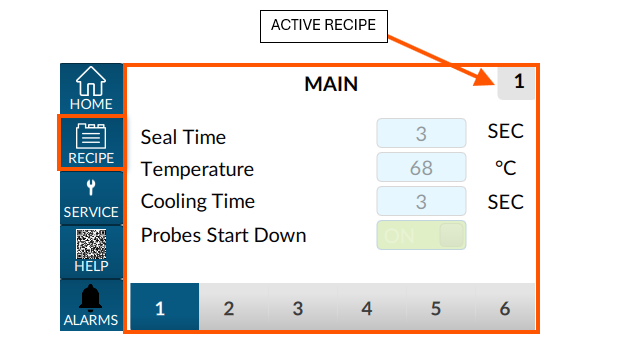
*See section 6.2 for recipe value descriptions.
- 1= Main
- Seal Time
- Temperature
- Cooling Time
- Probes Start Down
- 2 = Options Based on the machine build it can display settings for:
- Gas Selection
- LH Bag Stretcher Enabled
- RH Bag Stretcher Enabled
- 3rd Bag Stretcher
- High Low Head
- 3 = Cycle 1 values:
- Vacuum Pressure 1
- Soak Time 1
- Gas Time 1
- Pause Time 1
- 4 = Cycle 2 values:
- Vacuum Pressure 2
- Soak Time 2
- Gas Time 2
- Pause Time 2
- 5 = Cycle 3 values:
- Vacuum Pressure 3
- Soak Time 3
- Gas Time 3
- Pause Time 3
- 6 = Cycle 4 values:
- Vacuum Pressure 4
- Soak Time 4
- Gas Time 4
SERVICE SCREEN
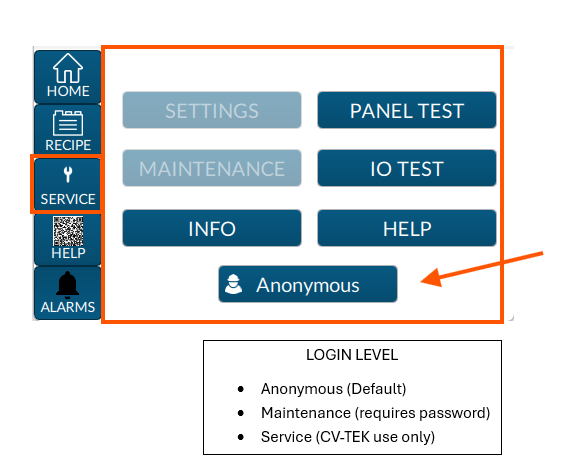
- This screen provides navigation to different parts of the machine, including LOGIN
HELP SCREEN
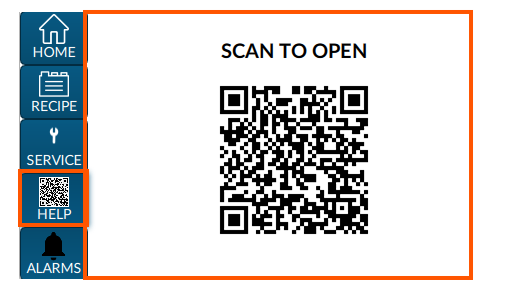
- Scan the QR code with your device and follow the link for more detailed information.
ALARMS SCREEN
- When an alarm is active the screen will blink a RED frame, and the Alarm button bell will turn RED.
ACTIVE Tab will display current alarms.
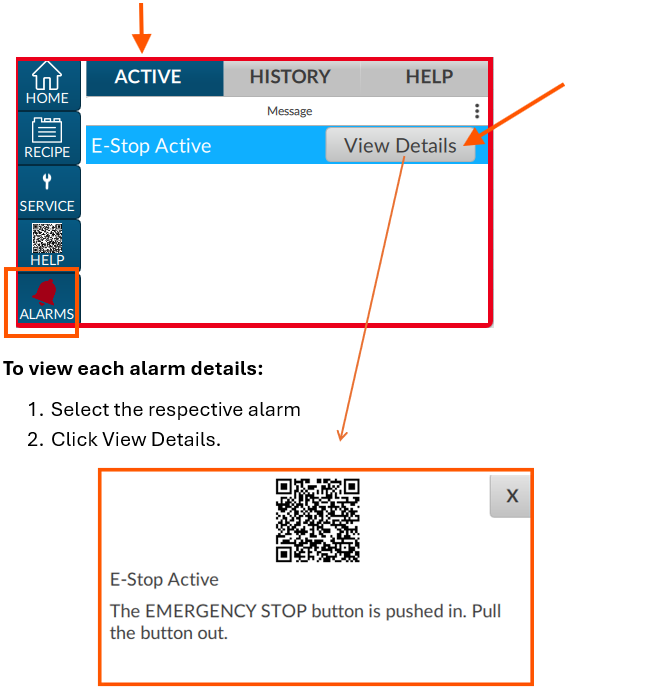
- Scan the QR code with your device and follow the link for more detailed information.
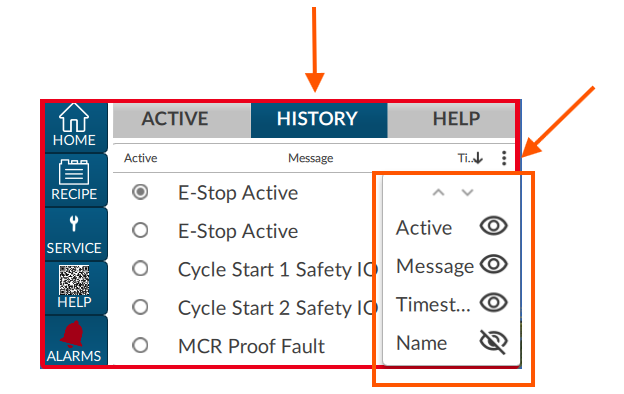
HISTORY Tab – click the 3 dots to select different views
SERVICE > PANEL TEST SCREEN
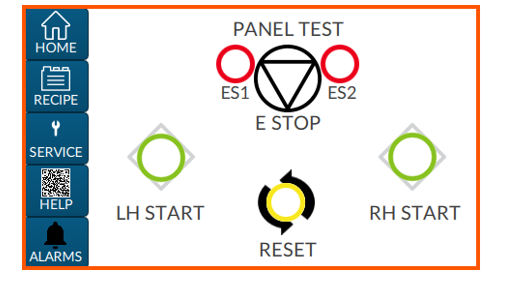
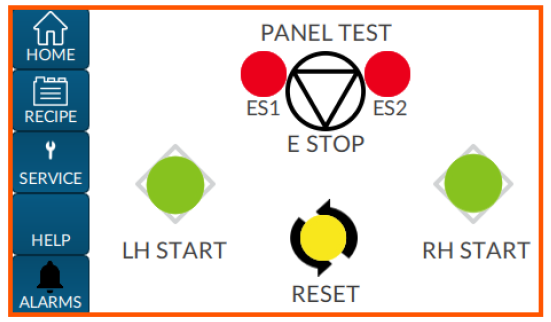
- Displays E-Stop, Reset, Left Hand and Right Hand Start buttons status.
- In the image below all buttons are OFF.
- In the image below all buttons are ON.
SERVICE > IO TEST SCREEN (IO= Inputs & Outputs)
- DI:1 = Digital Inputs Slot 1
- SI:2 = Safety Inputs Slot 2
- AI:3 = Analog Inputs Slot 3
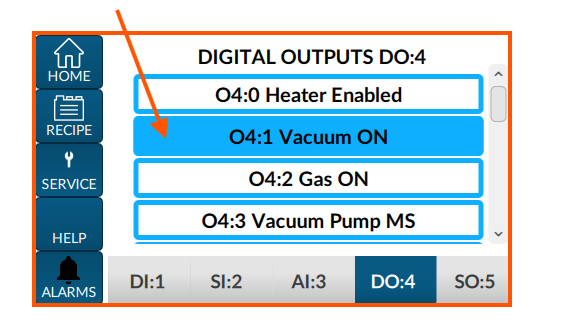
- DO:4 = Digital Outputs Slot 4
- SO:5 = Safety Outputs Slot 5
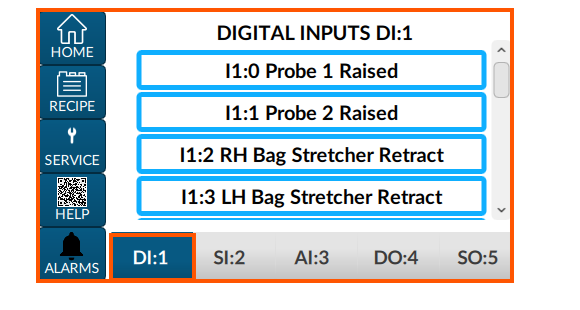
- Buttons marked in blue means that is Active (ON)
For the digital outputs (DO:4) a test mode is also available for the Maintenance user.
Test Mode is possible only if the machine is not cycling.
- TEST > Click on each button to activate and test outputs
SERVICE>MAINTENANCE
- Access to this part requires LOGIN
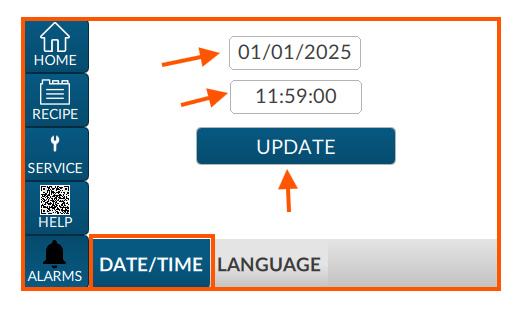
SERVICE>MAINTENANCE>DATE/TIME -update Date and Time based on your location.
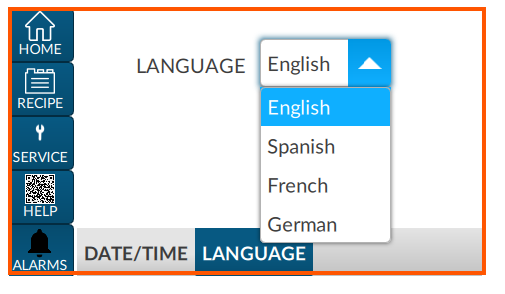
SERVICE>MAINTENANCE>LANGUAGE -change language of HMI text
6.2. PROGRAMMING
Users Enabled
- Anonymous (no password required) is the default user.
- Maintenance (Call service for password)
- Login required.
- Enable
- Date/Time Update
- Language Switching
- Recipe Edit
While you can review all the recipes settings in all the programs on the Recipe Screens (see OPERATION section of this manual, Page 6-3), none of the values can be changed without logging in with the Maintenance User.
To Edit a new program/recipe value take the following steps:
- Log in with Maintenance in the Service Screen. Click the “Anonymous” labeled button. (Password required)

2. After you are logged in as Maintenance go to Recipe Screen and edit your settings. In the image below you are editing Recipe/Program #8.
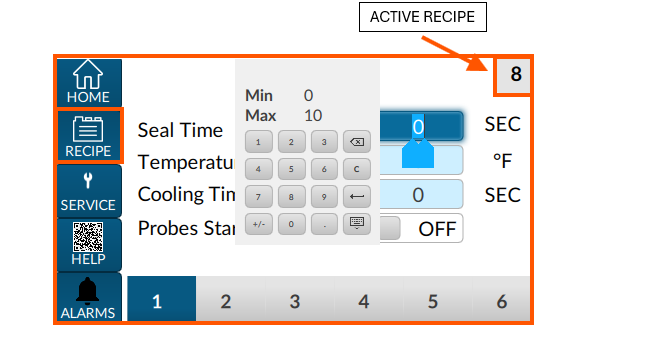
The following section will give you complete instructions on how to program each recipe tab
RECIPE 1 > MAIN
- To change values, click the box and enter the desired values. Allowed limits (range) are displayed also.
- Hit ENTER on keypad after value is entered to confirm your input.
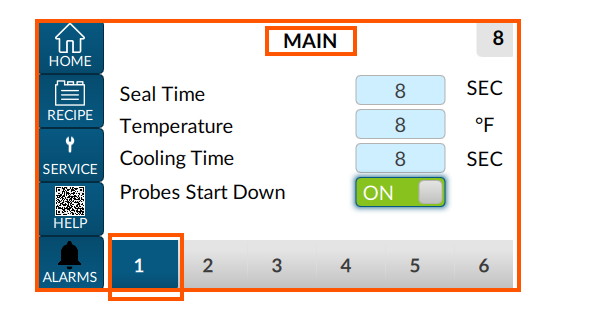
- Seal Time – This allows you to set a different heat seal dwell time for each program.
- Temperature – Allows you to set the heat sealer bar temperature.
- Cooling Time – Applies only to impulse heater models and is a cooling period to ensure the seal sets properly without reopening or deforming maintaining seal integrity and cycle efficiency.
- The cooling phase for impulse heaters typically lasts 2 to 10 seconds per cycle, depending on factors like the packaging material (e.g., polyethylene, nylon, or multilayer films), seal bar width, and ambient conditions.
- Thicker or higher-melting-point materials may require slightly longer cooling to ensure a strong seal.
- Impulse sealing involves heating the seal bar briefly to fuse the packaging material, followed by a cooling period to ensure the seal sets properly without reopening or deforming.
- Probes Start Down –options to start the machine with the probes UP or Down
- Probes Start Down – recommended for most applications
Probes Start Up recommended for large boxes
RECIPE 2 > OPTIONS
- NOTE: This part could be empty if machine options are not installed
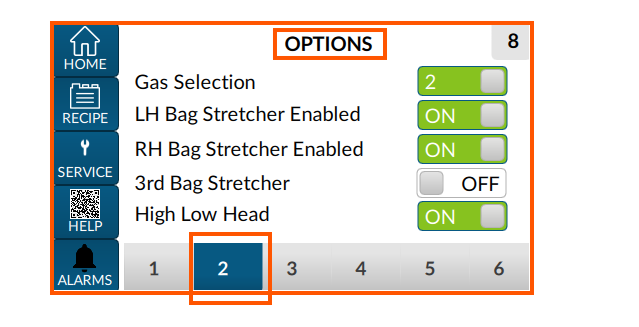
- Gas Selection – Applicable to double gas machines. Select which gas to use for gas flush between Gas 1 and Gas 2.
- LH Bag Stretcher Enabled – Applies to machine with bag stretcher. When enabled the machine will wait to cycle until the LH bag stretcher has been actuated. (LH=Left Hand)
- RH Bag Stretcher Enabled– Applies to machine with bag stretcher. When enabled the machine will wait until the RH bag stretcher has been actuated. (RH = Right Hand)
- 3rd Bag Stretcher– Applies to machine with bag stretcher. When enabled the machine will wait to cycle until 3rd bag stretcher has been actuated.
- High Low Head – Allows you to set the HI-LO head mount position either UP or DOWN. Each time that you press the ON/OFF BUTTON, the position reverses and the DISPLAY will also show ON/OFF
RECIPE 3,4,5,6 > CYCLE 1,2,3,4
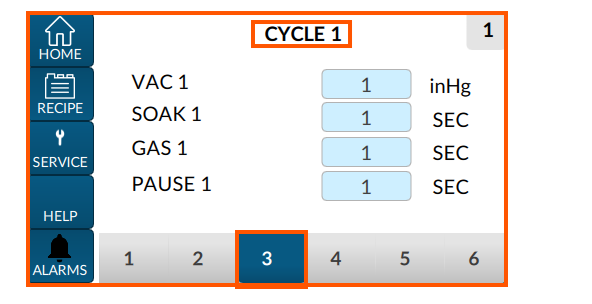
- Vacuum Pressure
- This will control how much vacuum is applied in each cycle.
- Caution!
- If you set the value higher than the range of your machine’s vacuum pump, the machine will be unable to complete the cycle (example: 30 inHg will not work). Range is displayed on screen. Different values are not permitted.
- Soak Time
- This gives you the option of extending the vacuum exposure for a period of time (seconds) after the vacuum SET point has been reached. It is typically used where there may be air pockets in a product, or for very large packages.
- A setting of 0 bypasses this function.
- GAS
- This sets the number of seconds of gas flush to be injected into the package. The volume of gas can be controlled by this gas time, and/or by the gas regulator pressure.
- A setting of 0 bypasses this function.
- PAUSE
- In larger packages, it may be necessary to give the gas flush time to circulate within the bag, before evacuating it with an additional vacuum cycle. This function is set in seconds. A setting of 0 bypasses this function.
- The start of each repeat will be indicated by VAC 1, VAC 2, VAC 3 or VAC 4.
- Steps within each repeat (SOAK 1, GAS 1, PAUSE 1 CYCLE 1) will also be indicated by number.
- To end the machine cycle, set a value of 0 for all remaining functions in the program.
- There is a total of 4 cycles for each program (recipe).
EXAMPLES
- Basic vacuum (only) program:
- VAC 1 SET: 015.0 (Hg”/mb)
- SOAK 1 SET: 00.0 (seconds)
- GAS 1 SET: 00.0 (seconds)
- PAUSE 1 SET: 00.0 (seconds)
- ALL REMAINING FUNCTIONS – SET: 00.0 (seconds)
- Basic vacuum/gas flush program:
- VAC 1 SET: 015.0 (Hg”/mb)
- SOAK 1 SET: 00.0 (seconds)
- GAS 1 SET: 01.2 (seconds)
- PAUSE 1 SET: 00.0 (seconds)
- ALL REMAINING FUNCTIONS – SET: 00.0 (seconds)
- Vacuum/vacuum soak/gas flush/pause/vacuum/vacuum soak/program:
- VAC 1 SET: 016.0 (Hg”/mb)
- SOAK 1 SET: 01.0 (seconds)
- GAS 1 SET: 01.4 (seconds)
- PAUSE 1 SET: 01.0 (seconds)
- VAC 2 SET: 014.0 (Hg”/mb)
- SOAK 2 SET: 0.7 (seconds)
- GAS 2 SET: 00.0 (seconds)
- PAUSE 2 SET: 00.0 (seconds)
- ALL REMAINING FUNCTIONS SET: 00.0 (seconds)
- Double-flush program:
- VAC 1 SET: 015.0 (Hg”/mb)
- SOAK 1 SET: 00.0 (seconds)
- GAS 1 SET: 01.5 (seconds)
- PAUSE 1 SET: 00.0 (seconds)
- VAC 2 SET: 012.0 (Hg”/mb)
- SOAK 2 SET: 00.0 (seconds)
- GAS 2 SET: 00.9 (seconds)
- PAUSE 2 SET: 00.0 (seconds)
- ALL REMAINING FUNCTIONS – SET: 00.0 (seconds
When all programming is complete,
- Log Out
- Go to HOME Screen
- Select Active Recipe (1-8)

4. The selected recipe is now the Active recipe that the machine will run.
6.3. OPERATION
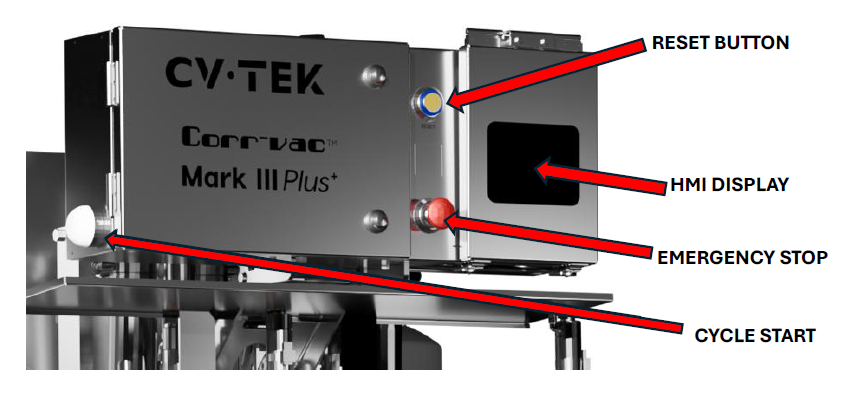
When electrical power is turned on (with the main rotary electrical disconnect switch at the back of the machine), the DISPLAY and the EMERGENCY STOP BUTTON will be illuminated.
On Power Up the display will go to the INFO Screen. Navigate to HOME screen to see status and current settings based on Active Recipe
When you select a recipe, the DISPLAY will show the recipe number, the current sealer bar temperature, the current vacuum level, machine state and cycle state. To edit a different recipe, you need to
- Set Active
- Login as Maintenance
- Go to Recipe screens
If a package is properly loaded in place on the machine head, an automatic packaging cycle will begin when you press both the two-hands push buttons at the same time.
- If your machine has an air-operated vacuum pump, it will automatically turn on when you start each vacuum cycle, and it will turn off as each vacuum cycle is completed
- On machines with electrically driven vacuum pumps, the pump will normally run continuously. However, the machine incorporates a power-saving system which shuts down the pump if the machine has not been cycled within 15 minutes of the previous cycle. To start up the pump, simply close the jaw to start a machine cycle
As the vacuum increases to its programmed SET point, you will see the vacuum readout changing on the DISPLAY. When the cycle is completed, the machine’s jaw will automatically open, for unloading/reloading packaging.
If for any reason, the vacuum in the package does not reach the programmed SET point, the machine will not complete the packaging cycle of the bag.
If loading looks OK, then check for a hole in the bag. Once the problem has been corrected, you can load the bag into the machine and restart the packaging cycle by:
- Clearing the faults -hit the RESET button first (Yellow button)
- Press two-hand start buttons (Left and Right)
All programming options are shown on the recipe part in the PROGRAMMING section of this manual. You must be logged in as Maintenance to change the settings for any program/recipe in the machine.
If you press this BUTTON, it will immediately shut down the vacuum pump. If the machine is cycling, the vacuum probes and/or the heat sealer bar will return to their retracted positions, and the packaging cycle will stop. The screen will be framed with a RED Border and the alarm button will turn RED.
You can reset by pulling the BUTTON out.
Cycle Skip (MAINTENANCE user only)
- If the machine is running through a packaging cycle, each time that you momentarily press this button, the machine will immediately stop the portion of the cycle that it is in and move on to the next portion.
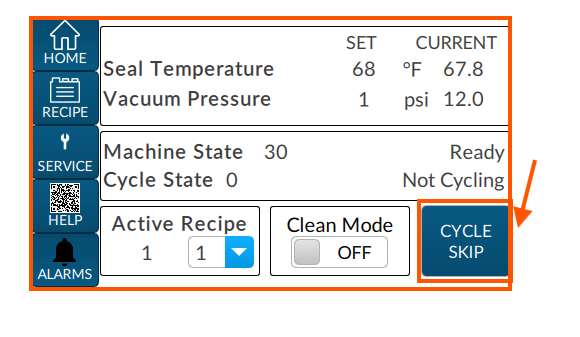
Clean Cycle
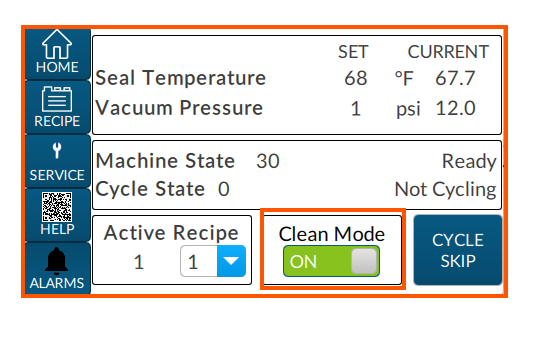
- Enabling this BUTTON will prepare the machine for internal cleaning of the vacuum system. You will also see the following message on the Home Screen:
- Clean Mode ON with the green color

- The jaw must be open to use this program.
- When you select this program the vacuum pump will start up.
- The vacuum valve will open, and remain open, for the entire period.
- When you wish to cancel the CLEAN CYCLE, push the BUTTON again. The Button will change to:
- Clean Mode OFF with the gray color, and the vacuum pump will automatically shut down in 30 minutes, if the machine is not used again.

